


At this point, it would be difficult to find a solution that doesn’t tout itself as extremely simple and easy to use. After all, who wants to build or use a complicated app? Well, no matter how simple providers have marketed them out to be, Contact Center solutions were always a bit more complex. We’ve seen the industry shift towards simplicity, introducing new features such as drag and drop tools to build complex Contact Flows. This is a good start, but simplicity of a solution is more than just turning down the options for users.
Everything in life is balance, and balancing both the power and complexity of a solution with simplicity and ease of use is no easy task.
Amazon made pretty big news during Enterprise Connect this year by introducing a new contact center solution, Amazon Connect. Clearly, Amazon is pushing itself beyond just infrastructure and hosting services — this move signifies a push into the already large Contact Center Software market by offering a new platform as a service.
But what’s interesting to note is Amazon’s reason behind developing a Contact Center solution. The online giant felt that existing solutions just didn’t cut it for their demands. Between complicated solutions with an awful user experience, to complex pricing models, Amazon wasn’t happy with their options on the market.
So, simplicity is the name of the game. And a great, simple experience starts right with the design and UI. After all, how can your product be simple to use if users cannot even understand how to navigate your app?
Now, I always like to start off with the disclaimer that design is very subjective. What I like, and what works for me, is not what everyone else might like. However, if a new user is confused and lost, then this most likely means the designer failed at their job. For example, have you ever pushed a door that was meant to be pulled open? Well, that’s not your fault.
Okay, maybe many of us could afford to pay attention more and stop texting and walking — but in reality, this is the fault of the designer. Design should be so implicit and simple that anyone can understand what to do right away. We think little about it, but this is a very common theme important anywhere in life. From doors, stairs, elevators, exit and warning signs, road signs — the designer’s job is to make something simple and easy to use to prevent confusion. We already saw a basic theme emerge in Amazon’s UC solution, Chime. While the solutions are not exactly the same, some basic ideas carry over, especially the idea of simplicity.
Connect’s Basic Design
When designing a User Interface, we can take this aspect and apply it to the software we are testing. For UI design, there are some crucial elements and aspects that need to be addressed. A successful design is one that looks attractive, but more importantly makes the app very easy to use. This is why design and User Experience overlap heavily. But bringing this back around — when it comes to Amazon’s design choices for Connect, it seems as if they really nailed it.
Right off the bat, the UI is very simple and clean. One might argue the design is almost too clean, but this just helps pave the way for the overall user experience. After all, Amazon’s entire goal was simplicity without removing the powerful features all Contact Centers need. This goal is actually echoed in the design choices throughout. (Bear with me for a second, but it’ll make sense.) Overall, Amazon Connect’s web client has two main points of navigation: a black navigation bar running horizontally along the top of the page, and a blue bar running vertically down the left side. So far, so good — this is all fairly standard.
Navigation and Menus
Keeping it simple, all menu options are signified with a flat icon. Colors are consistent and simple as well and are used to help distinguish different sections. Along the top bar we have a nice Amazon Connect logo on the left side of the screen, but on the right we see the current user logged in, an option to log out, a button to pull up the softphone, and a simple question mark for Help. I made a note of the Amazon Connect logo because this acts as more than just a reminder of the app you’re using. Simply click on the Amazon Connect icon in the top left, and you’ll be instantly redirected to your homepage dashboard.
![]()
Moving down the page, running vertically along the left side of the screen is the second navigation panel. Again, icons signify selections, and from here is where my original statement will begin to make sense.
![]() With only four icons, your first thought might be, “Wow, there are, like, no options here,” but that’s just not true. Hover over one of the icons, and you’ll be greeted with a new drop down menu. From top to bottom, these menus are: Dashboard, Metrics and Quality, Routing, and Users. Dashboard only has one option: to bring you to your home screen.
With only four icons, your first thought might be, “Wow, there are, like, no options here,” but that’s just not true. Hover over one of the icons, and you’ll be greeted with a new drop down menu. From top to bottom, these menus are: Dashboard, Metrics and Quality, Routing, and Users. Dashboard only has one option: to bring you to your home screen.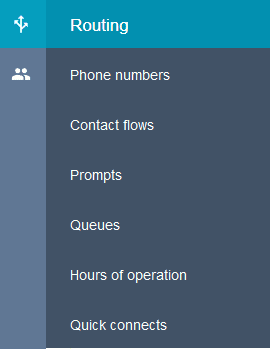
However, the three other icons have five or six options. This is what I meant when I said that Amazon made Connect really, really simple without sacrificing any of the powerful features or important aspects required. This is reflected in its design, which doesn’t bog users down with huge menus and lists. There are only four main options that expand to house only five or six other major options. Everything is accounted for and everything is right where you’d expect it. This leads to a very clean UI design, which helps users focus on what they need to do instead of navigating to find where they need to be.
Bringing It Together
As you may expect, the majority of functions carried out on this portal are configuration options. This means users can setup their hours of operation, create call queues, or customize contact flows. While every menu will have its own unique functions, fields, buttons or links, the design stays consistent throughout. As you can see here with the Add New User menu, everything is very clean, basic, labeled, and presented in an organized, simple fashion.
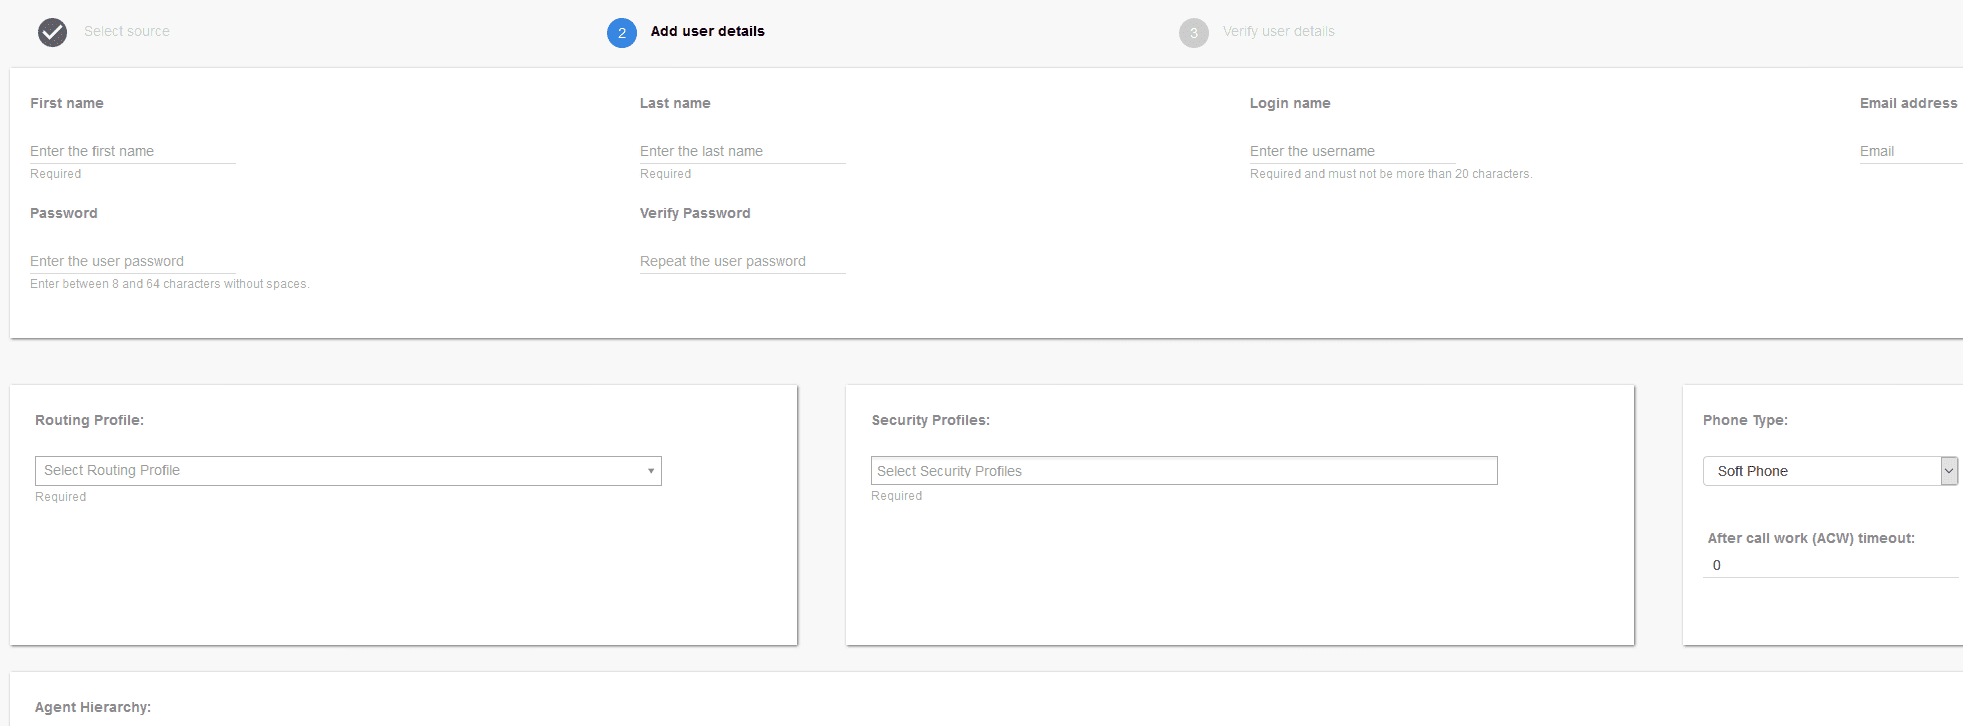
I also love the helpful explanations that are sprinkled throughout as well as under required fields. Overall, I think Amazon hit the nail on the head when it comes to design. There’s no unnecessary clutter, no distracting colors, and no ambiguity in the layout. Everything is clean, easy to read, understandable, and organized.
Now as I mentioned above, the user experience and design of an application or solution will go hand in hand. The way you design your UI will help users get around, and an effective UI leads to an effective user experience. After all, UX is probably the most important aspect to any product. Slack is always a great example of how a pleasant user experience combined with a fun and simple design can lead to a successful product. It’s not that something entirely new is being done, but these elements provide a better way to get that same task done.
The General Concept
With Amazon Connect, the simple UI helps pave the way for a simple UX. Contact center solutions are inherently complicated: there’s a lot to manage and a lot of features crammed into one solution. But following their overall idea of simplicity, the menu design of Connect leads to a very simple navigation process. With features organized into only three categories, it’s difficult to get lost, and everything is only a click away. However, we’re sure that as time goes on, this might change a bit as integrations and add-ons are brought into the mix. Hopefully, though, everything can stay as clean and simple as it is now.
If you do somehow manage to find yourself lost, click either the Amazon Connect logo or the Dashboard button on the left side of the screen and you’ll return to a step-by-step guide on how to configure the system. Overall, the number of clicks to jump from location to location are very minimal, and everything is laid out in a clean, organized fashion. Descriptions can be found around every page to help users make sense of what’s going on, and simple color is used to distinguish sections and clickable items.
![]()
Generally, users will be creating different functions — business hours, IVR flows, and user profiles are just a few examples. One really nice feature is that Connect allows admins to write descriptions every time they make a new profile, flow, or any other aspect of the system. These descriptions allow users to leave brief notes to stay organized and understand what does what at a quick glance.
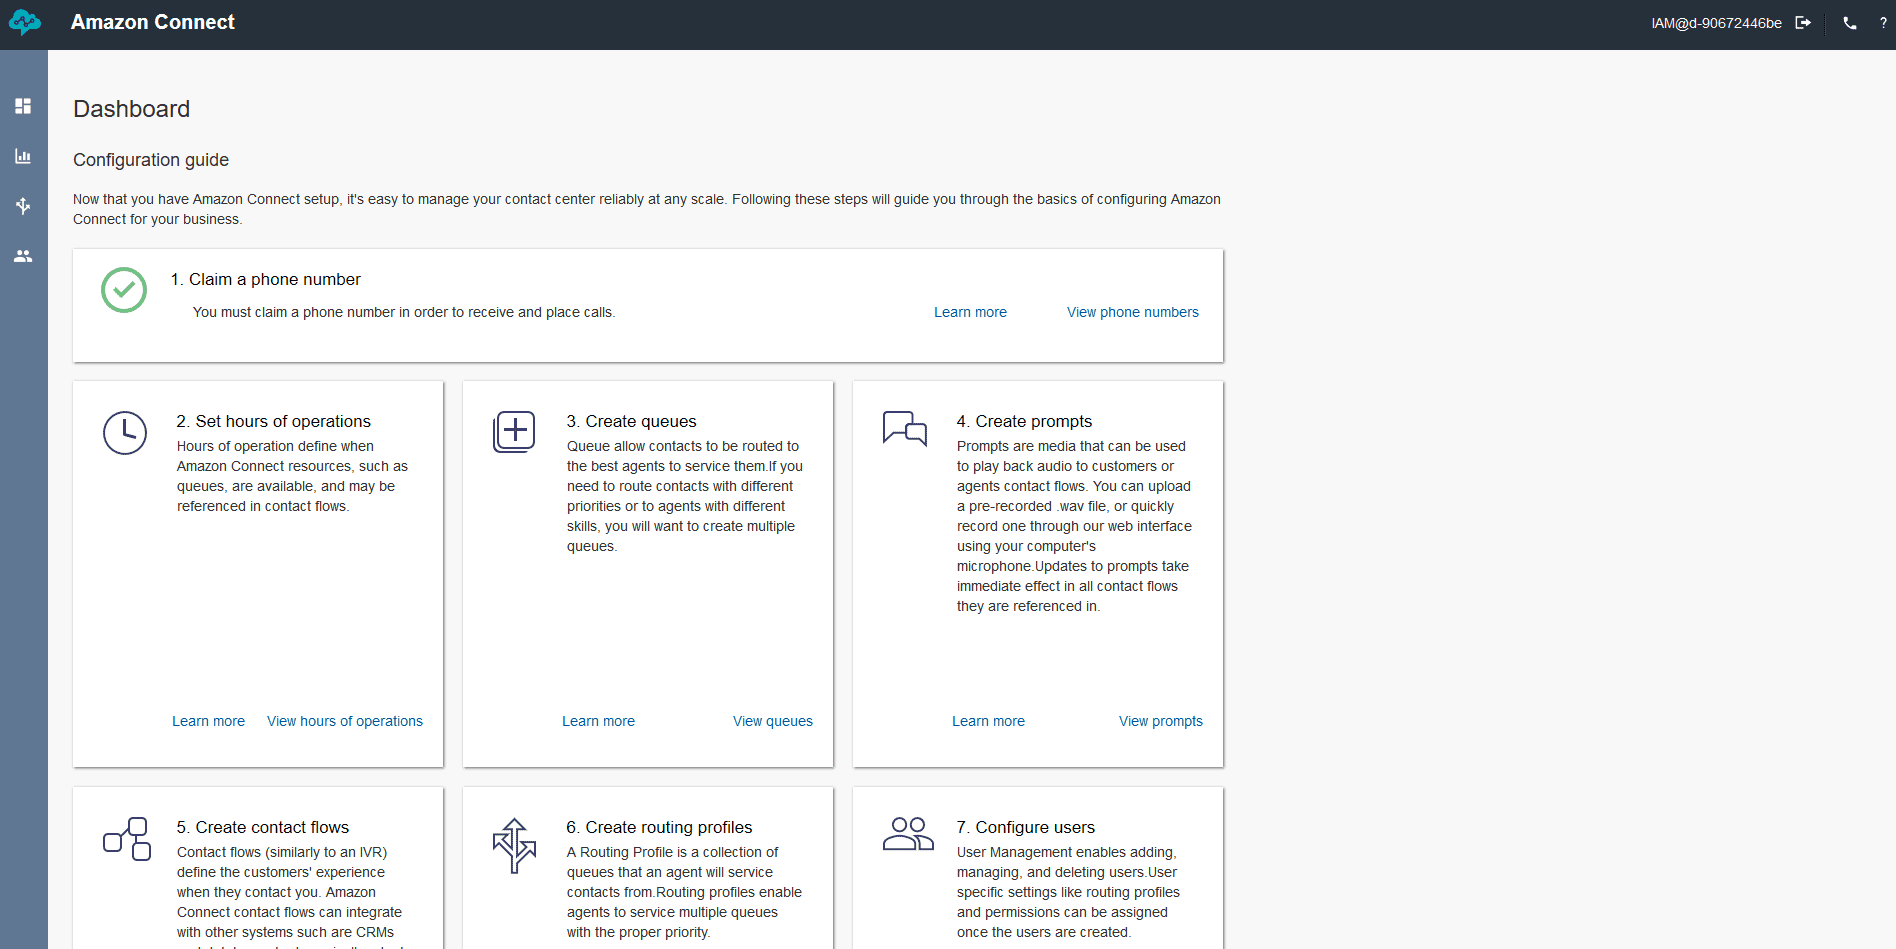
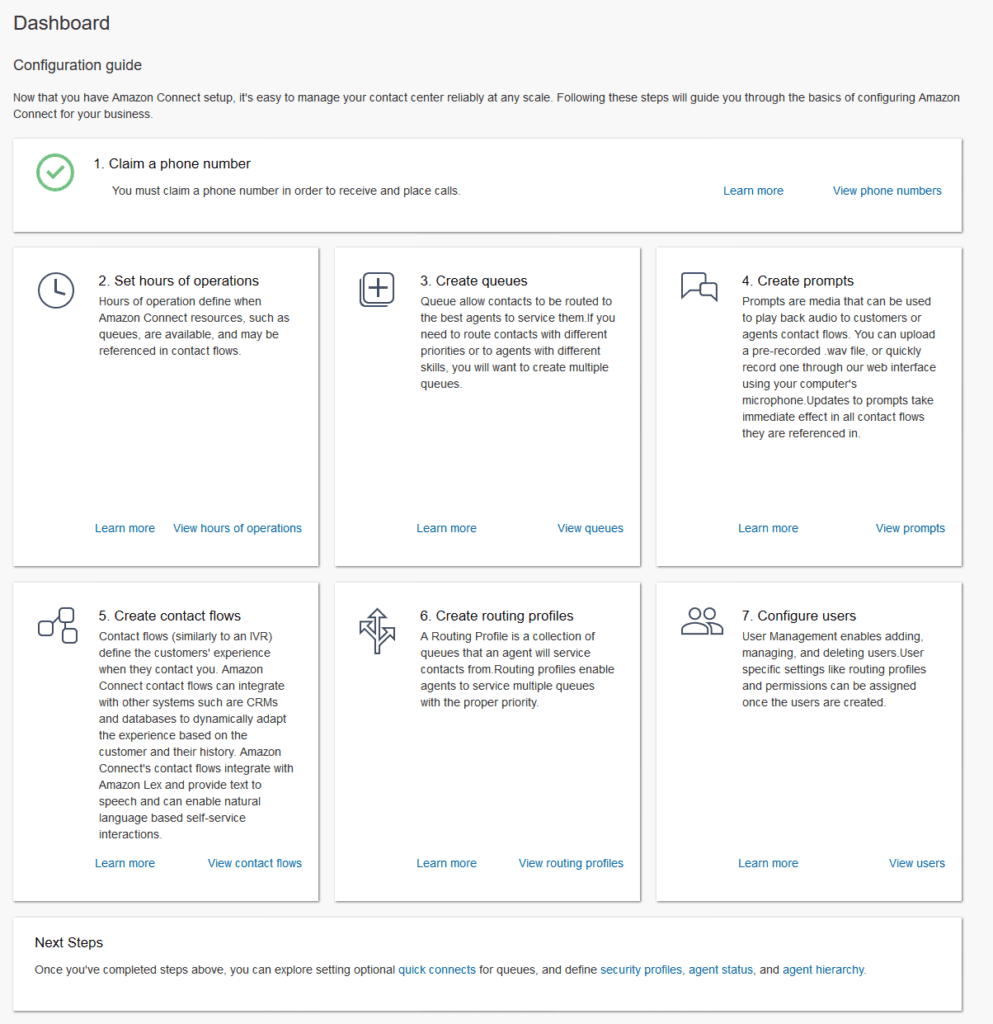
Creating Your Contact Center
Now, it might be a little difficult to distinguish Amazon Connect as a contact center over a call center, but the options included are quite impressive. Generally, most of Connect is navigating basic menus and inputting simple information into basic fields. The real user experience comes from actually using the solution — establishing your contact center from phone number, to agents, to contact flows, and IVR interactions. Now, every contact center will be set up in a different manner, and Amazon Connect does a great job of leading you through that entire process. This won’t be a tutorial on how to create your own contact center with Connect, but I will provide a close look at how it all works. So, let’s run through the steps just as Connect does.
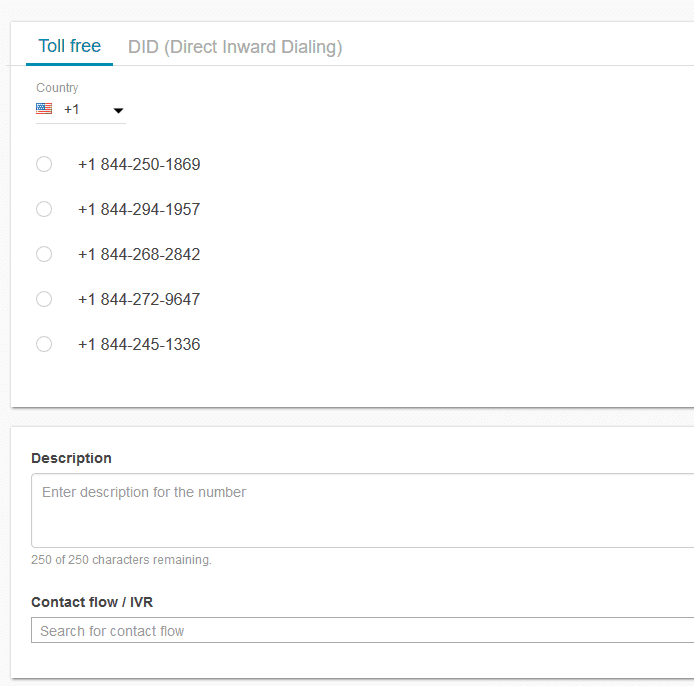
Claim a Phone Number
Pretty simple and the first thing you’ll do when logging in. Either use your own number from a separate service, or rent one from Amazon.
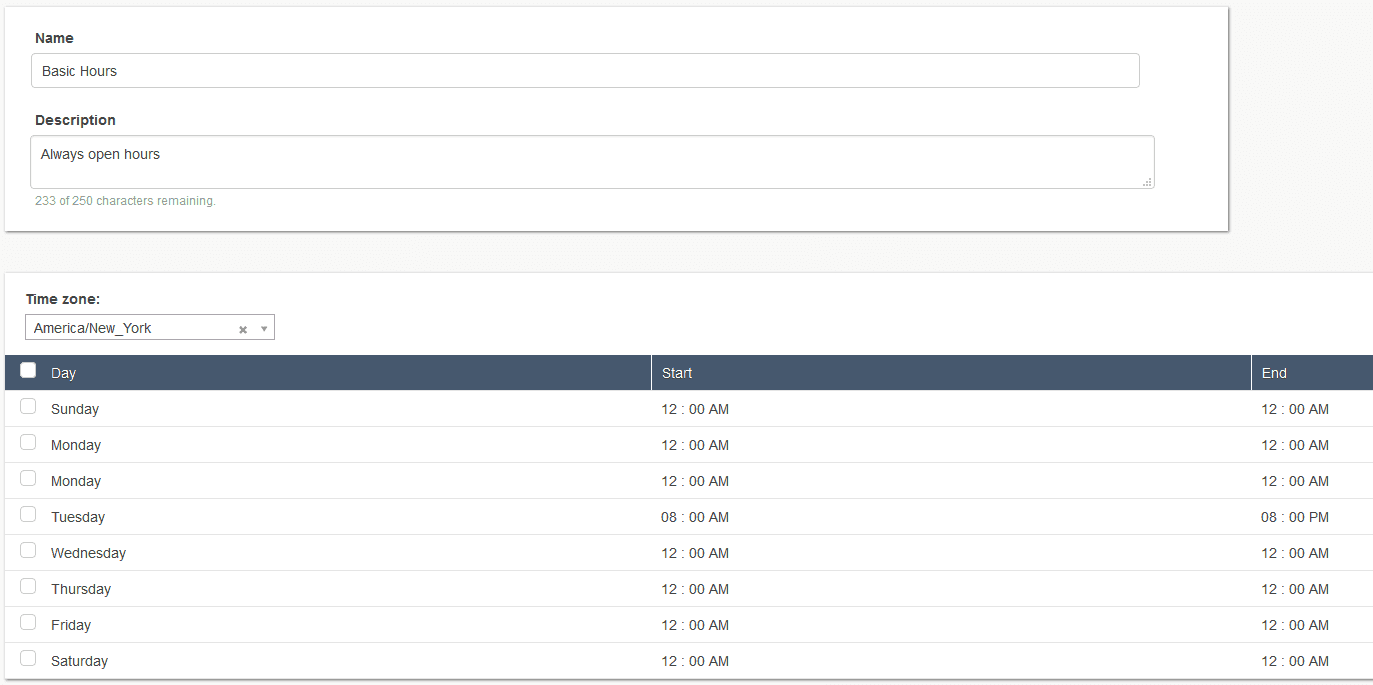
Set Hours of Operations
This simply sets the time your system will be available, as per your business’ hours of operation. You can choose different times for different days using a basic table, allowing users to change time zone, specify which days the center will be open, and the hours per each day. Users can also create multiple profiles, which could allow for basic hours and holiday hours.
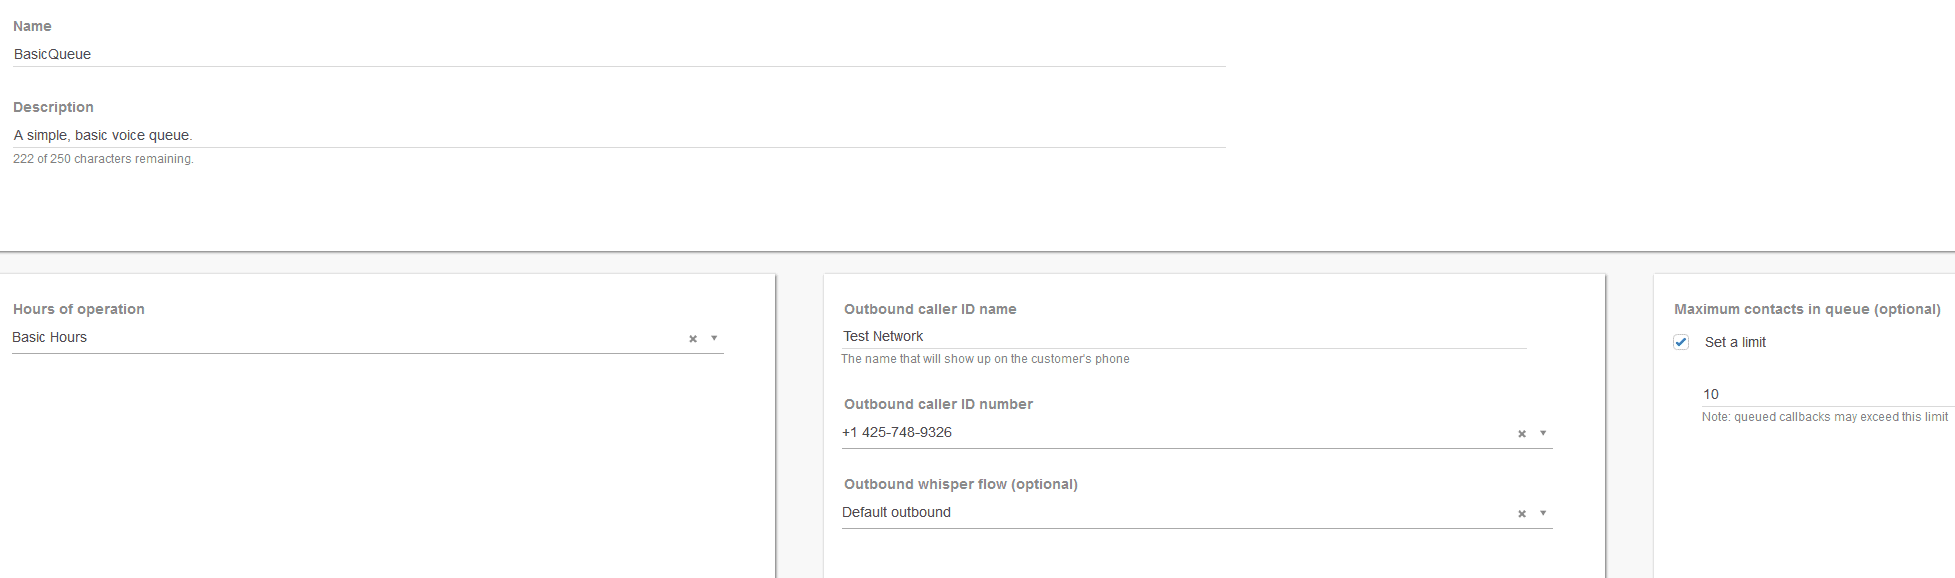
Create Queues
Queues help your center separate callers and direct them into the proper contact flows or agent pools. This section allows users to create different queues for different divisions, sections, teams of agents, levels of support, etc. Again, by filling out a basic form, users can choose between specific hour profiles, create an outbound caller ID name, choose a number, a whisper flow, and set the maximum contacts allowed in that queue.
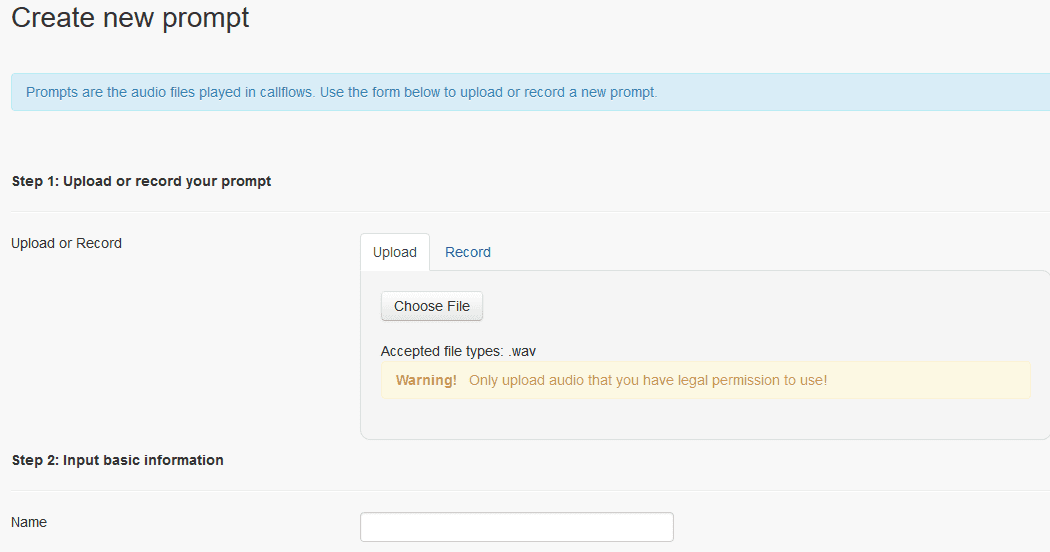
Add New Prompts
This is where things start to get a little more interesting. Prompts are sound files, or recordings, that your contact center will play to callers at different points. So, if you want music on hold or a beep to play when an agent puts a caller on hold, the Prompts section is where you manage those files. The main menu is a list of existing prompts, Amazon provides a few, and creating a prompt is a simple process of unloading a file or recording a sound, then naming the prompt. Again, really simple forms to fill out with descriptions as well as clean labels all around.
Create Contact Flows
We’ll take a closer look at this process below, but contact flowers are essentially IVR interactions. These are the “flows” your callers will follow depending on the menu choices they make. Contact flows establish the overall customer experience, and how you configure flows is an important part to establishing a functional center.
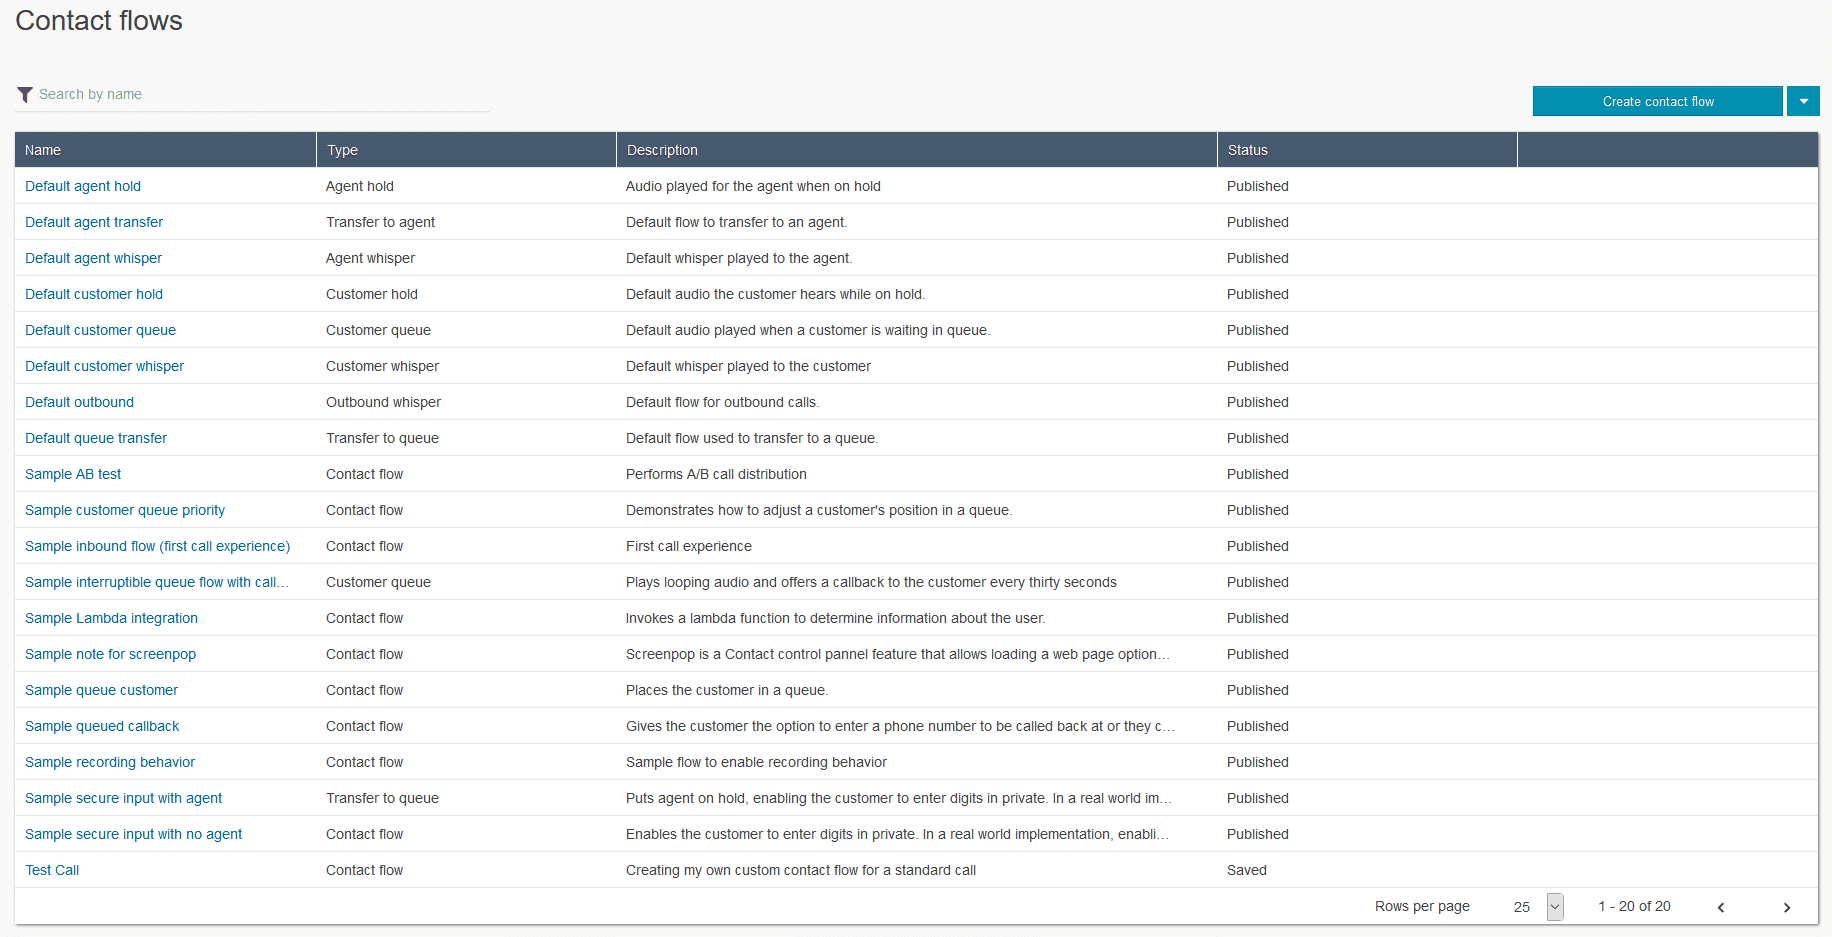
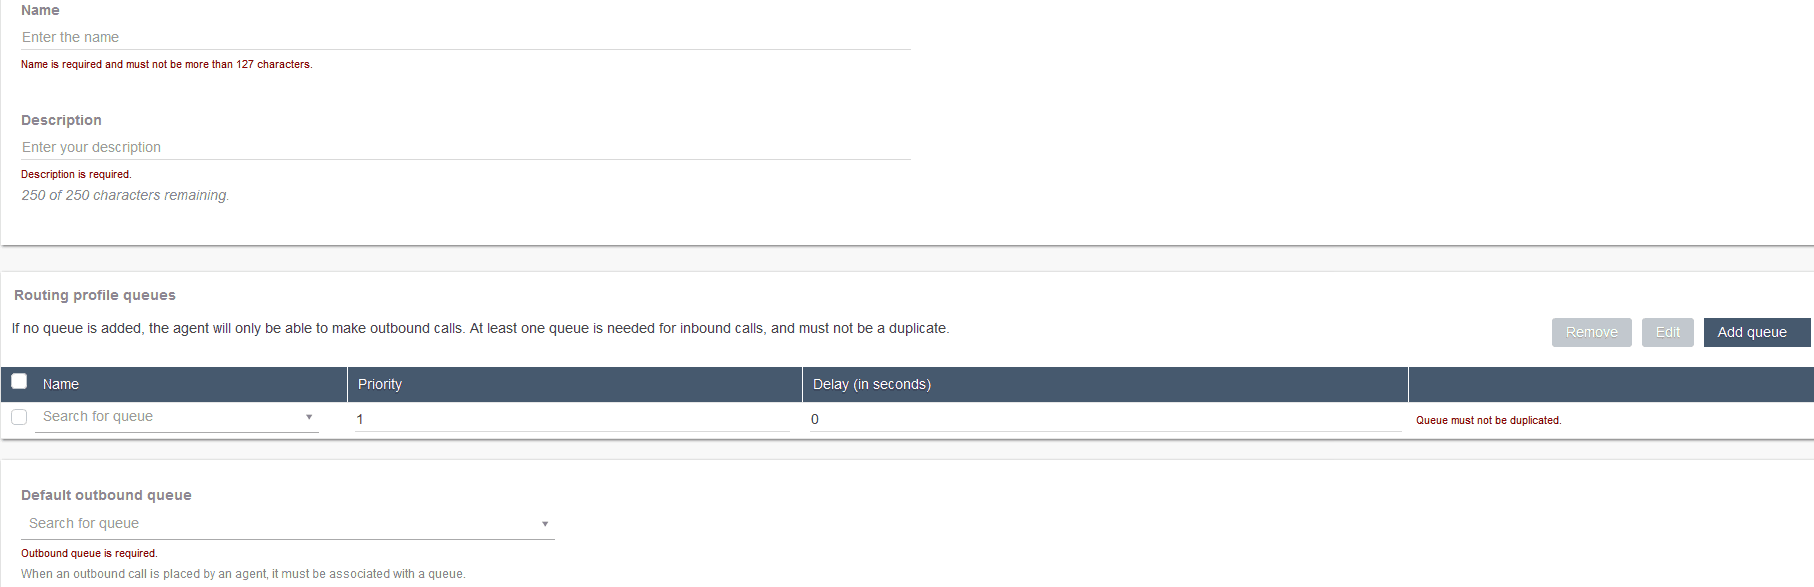
Create Routing Profiles
These profiles are a “collection of queues that an agent will service contacts from.” Depending on the level of the agent, these profiles can be configured to allow agents to service multiple queues, or narrow an agent’s focus down to one specific queue. Following the basic on-screen options, creating a routing profile consists of selecting your previously made queues and labeling a “priority” hierarchy with numbers.
Configure Users
Either manually enter users or bulk upload an existing database if your center is migrating solutions. From here admins can manage all users with basic information like name and email, but more importantly establish a login and password, select routing profiles, security profiles, phone type (softphone or physical IP desk phone), and establish an agent hierarchy. Everything is done through basic input fields and drop down menus, but this is your last step because you need to establish the routing profiles, which requires you to setup your queues.
The whole process walks you through each steps one by one, filling out one prerequisite before moving on to the next. To put it bluntly, Amazon Connect really holds the user’s hand and guides them through the entire process. And that’s a good thing: Amazon’s goal was to create a simple solution, one that anyone could pick up and put together in a few hours, let alone a day. Based on just my short time playing with the entire platform, I think it’s safe to say they managed to hit that nail on the head.
With not much prior experience, and without any tangible data or experience to pull from, I was able to follow along and establish the basic shell of a functioning contact center. I wasn’t lost or confused, but I also wasn’t overwhelmed with detail. Connect does a great job of laying everything out in front of you without walls of text or super long tutorials. Descriptions are short, and everything is laid out so simply that the basic labels are more than enough to understand what needs to go where.
Logging In as Agent
But all of this is what your admins will see when they log in. What the agents see differs greatly. All your agent will pretty much have access to is their Soft Phone window. Thanks to WebRTC, Connect’s agent window should open on any web browser, and doesn’t require any extra downloads, clients, or plugins.
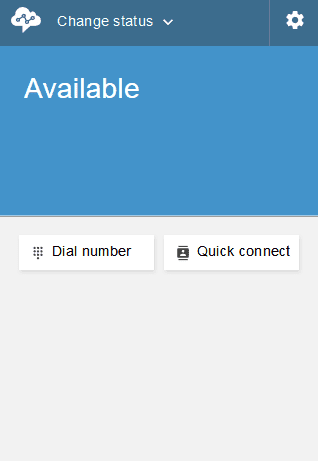
This basic display shows the agent’s status (either Available or Offline) as well as the actual Soft Phone dial pad, and a “Quick Connect” button to search for a specific contact and connect with only two short clicks.
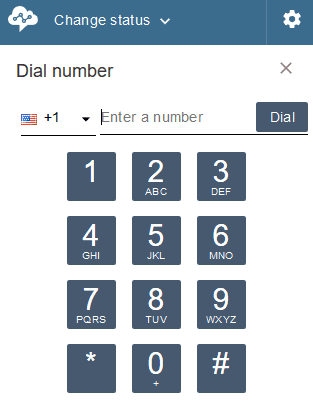
A settings button on the top right of the screen will allow your agent to distinguish between utilizing the soft phone or a desk phone with an option to input a specific phone number. However, this will mostly be handled by the administrator in charge of provisioning phones.
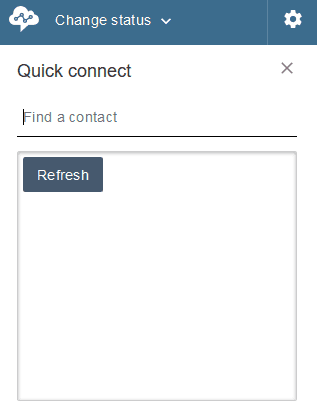
Overall, your agent receives a very simple and basic experience — no extra buttons or dashboards to worry about. Just a basic soft phone that displays relevant information and works easily in conjunction with a CRM or other solution, thanks to integrations. Again, we can see the simplicity theme throughout the entire Connect platform.
Now, contact flows are arguably one of the most crucial aspects of your entire contact center. After all, your center is here to service callers, and providing the best experience possible is the end goal. These solutions, like Amazon Connect, are designed to help make your life easier so that you can make callers’ lives easier. This is specifically where contact flows come in, and why I am going to dedicate a specific section to taking a closer look at what they are and how they work. Overall, Amazon Connect does a pretty great job of handling contact flows.

Contact flows are simply “editable road maps” that direct your callers through the contact center. Contact flows can be considered Connect’s version of an IVR, and will be used to establish an entire system that guides your callers around.
Starting off fresh, Connect already comes with a pretty extensive list of contact flows. As you can see here, a few we have are: Default Agent Hold, Default Agent Transfer, Default Customer Hold, and Sample Customer Queue Priority. As you can probably tell just by the names, these flows essentially control the way your center works, and how the outside world interacts with your center.

Just to go hands on, I attempted to construct my own call flow. I’m no expert, and I’m sure many can tell me I did everything wrong. I also obviously left out a few things, but I wanted to get a feel for what it was like to use. The entire system is a very, very simple drag and drop procedure. The screen has two main aspects: a left panel housing all your modules, and your gridded canvas on which to paint. Opening up the sections on the left panel, Interact, Set, Branch, reveals specific actions: “Play Prompt,” or “Get Customer Input,” for example.
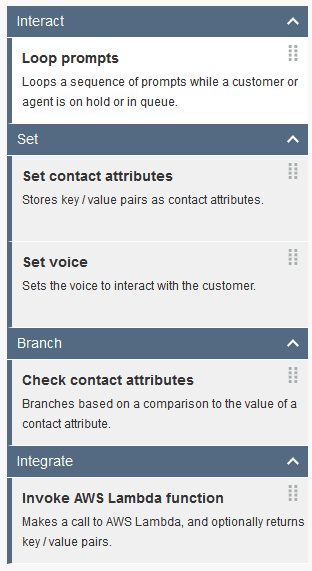
To create a flow, you will need to identify what it is this flow will establish. For example, if we want to figure out why a customer is even calling, we can choose the “Get Customer Input” option. This allows us to setup the process of establishing caller input and intent. So from the caller’s side, this would be the point at which the caller hears, “Please choose from the following list of options.”
To set this up, I simply dug through the different menus and found the most logical process: “Entry Point” to establish the call, “Get Customer Input”, “Check Hours of Operation”, and so on. The entire system works on a very basic logic sequence, following an “if, then” concept. If this happens, then this will happen.
The system is so simple and basic that after playing around for 15 minutes, I was able to begin piecing together this contact flow and establish a basic call procedure. The idea here is that there is no coding, no intense understanding, and no language knowledge necessary. Anyone, even without experience, can pick up this solution and start to play. Any seasoned veteran can have their contact flows established within minutes, if not a few hours.
Amazon had a pretty basic goal here with Connect. Existing solutions for contact centers were too complex, both in their usage and in their pricing schemes. Amazon needed something robust and powerful, yet incredibly simple for their own in-house support staff. They put together a solution and have grouped in some tech used in other Amazon products, slapped a really simple pricing structure on it, and is selling it as a solution. As it stands, Connect might be a very strong Five9 competitor.
Overall, I’d sum up my key takeaways as follows:
- Amazon is here in the Contact Center space, and brought to the table one of the most competitive solutions.
- Connect is incredibly simple to use and setup that even the most basic user can have it running in a short period of time — maybe only a few days.
- The pay-as-you-go Amazon Connect pricing and available numbers from Amazon allows even smaller businesses to adopt a very professional and cost-effective solution.
- Users can build a powerful IVR in hours or just days as opposed to the weeks it would take with more complicated systems.
- Everything integrates with CRM and other popular solutions; Amazon even provides the APIs to build your own integrations.
- Leveraging Amazon’s powerful AI, your center can provide both support for agents and a positive customer experience for callers. Your IVR can adapt based on incoming information and call metrics.
- Connect integrates with Amazon’s S3 servers for storing calls and metrics, as well as other third-party backup solutions.
- Powerful real time and historic metrics to help your center analyze the big data collected to optimize performance.
The main idea to come away with is that Amazon has entered the Contact Center software market, and they entered with a very strong presence. Building off their AWS infrastructure, Connect has a solid backbone and the necessary features all packaged in an incredibly easy to use platform.
As for that “other tech” I mentioned, Amazon is going to be including their natural language processing and AI tech that exists in their Alexa personal assistant. So Amazon clearly already had the pieces of the puzzle there, it was just a matter of putting everything together. With pay-as-you-go pricing on top of it, the solution is affordable with a pretty low barrier to entry. We think Gartner’s Contact Center Magic Quadrant might look a bit different next year.
")

